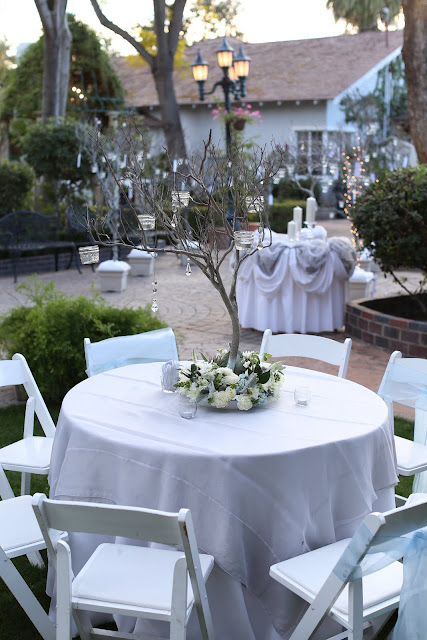
How To: Manzanita Wishing Tree Centerpieces
6:00 PM
My vision for my reception centerpieces was something that no one, try as they may, could sway me from. I love trees and tree branches, so our winter wedding was themed around that. My doubters tried to persuade me to go with traditional flowers for centerpieces or something less difficult. “Why do you want trees in the middle of the tables? How are you going to pull that off? Won’t people have a hard time seeing each other?” DON’T CARE. It had to be trees.
Now let me tell you a little something about dedication. One time during my engagement I called my mom, and she said, “Oh hey, we’re just on our way up to Payson to chop down some manzanita trees.” I admit that I teared up a bit, because who’s mother makes their dreams come true like that? They were determined to make these centerpieces on their own. What?! I know, it was crazy. I was in Utah, otherwise I would have been right there with them. But we still kept in close contact during the process. Here is a tutorial to making your very own manzanita tree centerpieces, or wishing trees, as I call them.
Step 1: Find a crew crazy enough to go hunt these babies down. My mom and dad quickly became manzanita tree experts, finding out where they grow, what colors they grow in, etc. They found them in Payson, AZ. Make sure you obtain a permit to do this, or find the tree branches at a craft store, garden store, wherever.
Step 2: Hang to dry. I wish I had a photo of this, but for weeks we had trees hanging upside down in our backyard attached to a clothes line. Hang the trees upside down until they are dead and dry, then remove any remaining leaves.
Step 3: Set in Plaster of Paris. Pour Plaster of Paris into a mold (about 5x5 or 6x6, depending on size of tree) and set the tree in the middle. We used a tupperware container. Allow to dry. Remove from mold to reveal a solid white brick as a base.
Step 4: Spray paint or flock to desired color. These trees came in a lovely deep red color. I wanted a natural dead tree look with a hint of white since our colors were silver, light blue, and white. We colored them a light brown and then added the white after, along with a bit of flocking for snow.
Step 5: Decorate your base. Our florist covered these with flowers, but you could put pretty much anything there that relates to the theme of your party. Fabric, a garland, lights, whatever!
Step 6: Find your accessories. Christmastime was a great time to find all kinds of baubles, beads, and sparkly things for the trees. My sister found these gems that turned out great for hanging. We decided to use the trees in place of a guest book and have guests write wishes for the bride and groom on hang tags. We bought the hang tags from a craft store and stamped them with “Best Wishes,” then added some rhinestones, obviously. Guests were encouraged to write messages and hang them on the branches of any tree. It worked great!
Step 7: Enjoy your beautiful trees!
I love these so much that I keep one in my house as decoration. I change it up every once in while for holidays and such. It has also been used for ward parties as decoration.


0 comments